The awakened affix places 4 obelisks in the dungeon at various points. When interacting with an Obelisk, you will cross into N'zoth's realm and be attacked by the Obelisk's mini boss, which has its own unique set of abilities and summons adds to defend it. When the mini boss dies, an interactable portal appears on its corpse that returns you to reality. While you're in N'zoth's realm, you are phased from the rest of the dungeon which means you can use these portals to skip whatever you want, you just have to kite the mini boss to where you want to exit. You can also choose not to kill any of these mini bosses before engaging the last boss. This will cause any that are still alive to teleport to your group as soon as you pull the final boss in the dungeon, but the upside is that they won't spawn extra adds. Check out the full list of awakened boss abilities here.
Dungeons and Affixes
After the 8.3 buffs, Vol'kaal Phase 2 lasts much longer so you need to be prepared for that. On the first Stench, use Wings/HA to spread glimmer on the 3 totems and your group. This should keep the group topped through Phase 1 and the beginning of Phase 2.
Once your cooldowns are over, make sure you start dispelling the squishiest member of your group every time Stench goes out. You'll want to use Devo before one of the Stench casts in between your Wings cooldown. Use Wings/HA as soon as they come back up.
The only healing required on Rezan is tank healing, but with the recent buff the bleed debuff that goes out on the tank does a massive amount of damage. Make sure you have good communication with your tank here, they need a major cooldown for every one.
You should still use Wings/HA together on cooldown for damage and tank healing, but let your tank know when your cooldowns are up so they don't overlap their big defensives with Wings. Use Sac for one bleed and Devo for another. You can also BoP the bleed debuff off if necessary but make sure you call it out before hand for your tank so they remove the BoP instantly or the boss will turn and melee someone.
The trash here can either be devestating or extremely easy dependant on the skill level and coordination of your group. There are a LOT of dangerous casts that go off and if you don't lock them down any one of these packs can quickly get out of hand.
Any pull with a Juggernaut in it will require someone to bait the jumps at range so if you don't bring a ranged dps, you'll have to be the one baiting which means you'll do almost no damage unfortunately. If you have to bait, stand on a snap spot (there are a lot in Atal) and the Juggernaut won't jump at all. Make sure you quickly dispel any Wildfires that get off.
The poison side of Atal is the only trash that has a healing requirement. Make sure you have big cooldowns going into any pack where you pull an Honor Guard. These mobs do a huge amount of AoE damage and put a painful stacking debuff on your tank. This debuff is BoPable but shouldn't need to be cleared unless they hit 3+ stacks. As with any time you BoP a tank, make sure you have good communication and they cancel it immediately or your melee will get one shot.
Use Blinding Light and HoJ to stop the Shieldbearer's Bulwark channels. You'll also need full cooldowns ready for the 6 pack at the bottom of the steps after Vol'Kaal, so make sure to save Wings/HA towards the end of the boss fight.
DO NOT TRY AND DPS THIS FIGHT. Phase 1 is the most healing intensive section of the fight by a long shot. You will need both Wings and HA grouped on pull with lust to heal through the shots on high difficulties. Make sure you're using Holy Shock to top the player that gets shot instantly or they will die to a consecutive shot.
For Phase 2, on low key difficulties you can stay in melee if you have a good ranged player in the group that knows how to bait, but in general I would suggest always being the baiter in ranged. Yes you will lose damage, but if you stay out and bait properly, it trivializes Phase 2 significantly for your group.
In order to bait, all you have to do is watch where the bird is in the sky (you can use the shadow on the ground so you don't have to look up) and watch the timer for spit. It will always spit on the closest person, so just stay under it and make sure when the spit goes out that you move before it hits the ground so you don't get slowed or take damage. If you ever need to run over the spit or it lands on you before you can move, Freedom will fully immune the damage and the slow. You can also use this to bait pools on top of existing ones.
Dependant on if Eudora is active or not, this boss can be difficult on tyrannical, but in general Holy Paladin is very well equipped to handle this fight. If it's Eudora, make sure you know who the squishy player is in your group. There isn't much to heal other then her Powder Shot, as most of the other damage is avoidable.
Once your cooldowns are over, use Sac or Devo on your Squishy player if they get Powder Shot. If you don't have either you can use BoP on them and it will fully immune the damage. Ideally you will be the most chosen target since you wear plate and it's all physical damage so it really doesn't hurt you much. Make sure you use Divine Protection any time you're targeted.
The only other thing you should watch out for is Blackout Barrel if Raoul is active. You can and should Freedom this debuff off as soon as it goes out. You can also Freedom before it goes out if you're quick, which will cause it to drop on the ground. Just be careful not to walk over it while it's on the ground or it will reapply the debuff.
Trothak should be relatively easy for you but it all depends on whether or not the boss bugs out. Unfortunately it looks like Blizzard has no intentions of fixing the bug that's caused by certain spreadable debuffs, pets and ground effects. One thing that for sure bugs out the sharks is the trinket Aquipotent Nautilus. If you're running with this, make sure you only use it after a shark is thrown and you know the trinket won't pass through one.
If you've never seen the bug, it's pretty funny at first. It basically makes the sharks have superspeed and the only way to stop them is to bring them into the blood pools. If the sharks become bugged, the fight gets very difficult.. but if they don't, it should be easy. Start the fight in melee with your cooldowns up, and when they are over, switch to being a ranged shark wrangler, keeping them away from your dps.

You should only ever do the Ravager packs from these groups as the Officer and Enforcer packs are very high risk. Since we don't have roots for the ravager pack, if you have a rogue have them run into the 4 pack while your tank taunts the Oarsman into the 2 pack. Your rogue uses Parry to tank the 3 on the side until the Ravager casts Painful Motivation and kills the mobs.
If you don't have a rogue or enough hard CCs, you'll need to do what the rogue does but use Bubble or BoP instead of Parry (if you have to use BoP, stun the Stormcaller).
Thankfully this was nerfed, but the Spit Gold debuffs will still truck on high tyrannical. Make sure you have something for everyone that gets targeted. If you can call out defensives / health pots for your group then you can use Wings/HA together on pull for damage, otherwise you should Wings on pull and then Holy Avenger the first Spit Gold debuff that happens once your wings are down.
Use Bubble if you get targeted when your cooldowns are down (but make sure to bubble before the actual animation hits you so you don't leave a pool of gold on the ground). Utilize Sac or Devo if you don't have cooldowns up and the targeted player doesn't have any defensives.
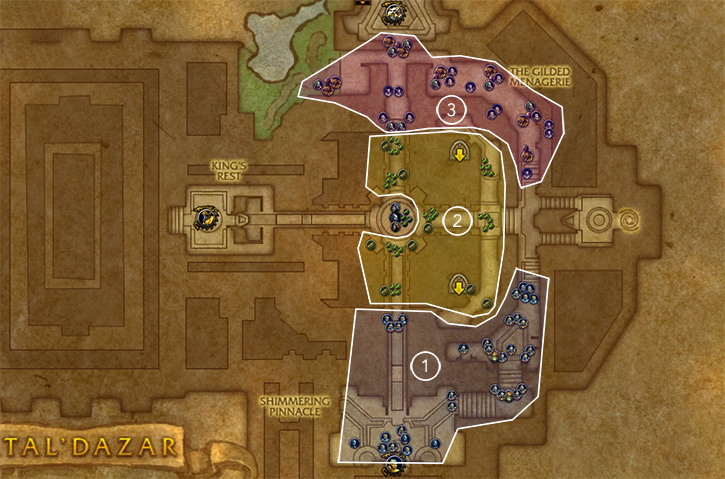
This boss is part of what makes Holy Paladin such a strong choice in King's Rest because the only dangerous boss in the group (Kula the Butcher) is basically a joke to you. There is only one thing in this fight that does real damage and that's the Severing Axe debuff Kula throws out during her active phase.
Fortunately, you rarely need to heal the debuff off at all since you can Bubble it off if it's on you, and you can BoP it off if it's on someone without an immunity. If you think multiple will go off due to your group comp lacking immunities or damage, you can hold you wings for the first non immuned debuff, but in general your damage on this boss is really important for killing her quickly before more debuffs go out.
This room is a great area for Holy Paladins as we can use Wings on every other pack (don't hold it for a certain pack just use it once its up at the start of any of them). If you don't have Wings for the Rahu'ai / Guard Captain pack, either have your group line or use Devo for the first Axe Barrage and Bubble/Sac the second.
You can also delay Axe Barrage by HoJing the mob. Beware of the tank damage on Patlaa (raptor 2 pack) on high keys, you will need some externals for your tank if you don't have Wings/HA up.
It wouldn't be King's Rest without Shadow of Zul (unless you have a DH in your group then have fun skipping it lol). Zul will absolutely blast your tank so have a strategy going into it. You and your tank should have full CDs. I've found the best way to do this is to have your tank hold all their cooldowns and have you pop Wings/HA on pull so you can pump heals and damage. The only damage you should try and do on this is maintaining a Glimmer on Zul and keeping Consecrate down. Outside of that just bomb your tank with healing.
Once your HA goes down, Sac the tank. If you get targeted by Dark Revelation, use Divine Steed to run out, Bubble, then run back in. Once your wings is down have your tank start using everything they have to survive. Once their cooldowns are down Zul better be dead or your tank better get the hell out and kite.
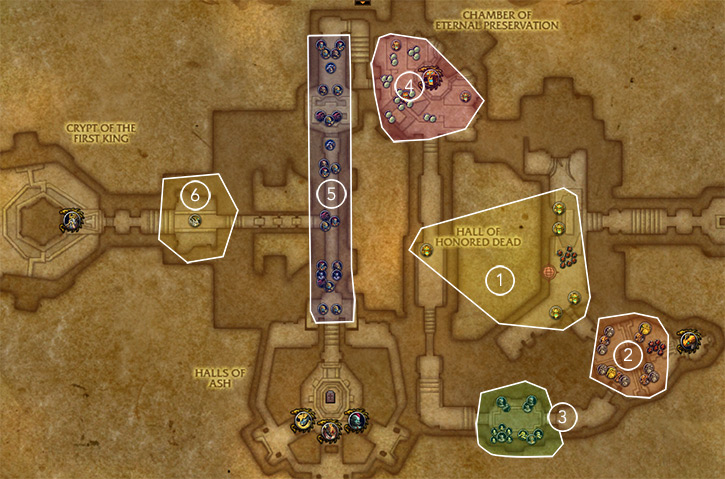
One of the cool things we can do on this boss is prevent the Choking Brine from ever even being applied. Using Freedom on the targeted player before the debuff goes out will cause them to immune it so no damage or swirls go out.
You can also Freedom or HoJ the Grasp of the Depths debuff if needed. If you Wings/HA on pull, they should be back up around the split intermission, which is perfect timing. If you get targeted by multiple undertows in this phase you should Bubble.
One of the nice things about being a Holy Paladin on this boss is your ability to immune an Ancient Mindbender cast. Every group that pushes keys tries to prevent the first Mindbender cast by having all their dps immune as soon as the cast starts. Fortunately, we happen to be the only healer with an immunity, making it so we can guarentee the first Mindbender doesn't go out if all the other dps have immunities as well.
There is pretty much 0 healing on this fight unless your group misses interrupts. If you get mind controlled and there aren't enough balls to break you out, you can use the well that you swim down to get to the final boss room to drop you as it does a lot of damage to anyone who jumps in. Just make sure as soon as you get close to 50% hp you jump out as once the MC breaks you will take a ton of damage instantly from that pool. It's often safer to try and jump out around 55% and then use one or two balls to do the last bit of damage.
Thanfully they changed this boss to only put the damage buff on healers, making this by far the most fun fight in any dungeon. There is no healing other then tank damage so you should be full offensive here. The best cooldown usage for this fight is as follows:
Wings/HA on pull to get as much damage in before the first transition as possible. Once you exit out of transition, go pull an eel pack so Wings can come back up. At this point, if you have left the middle 3 pack alive, use Wings/HA to blow that up and then go do the rest of the eels until Wings is back up. If your group did the 3 pack before the boss then just do the boss phase once your Wings is up out of the transition.
2 seconds before the boss is interrupted, drop Consecrate and pop Wings/HA. Have your other dps use all their cooldowns as well with lust and just ignore the adds that spawn (kite the boss away from them, they can go in during intermission). Unless you're doing an insanely high tyrannical key you should be able to one phase the boss from your damage alone. If not, just do the intermission and then kill him in the next phase. PRO TIP: Take Light of the Martyr off your bars for this boss so you don't accidentally kill yourself.. it happens to everyone haha.

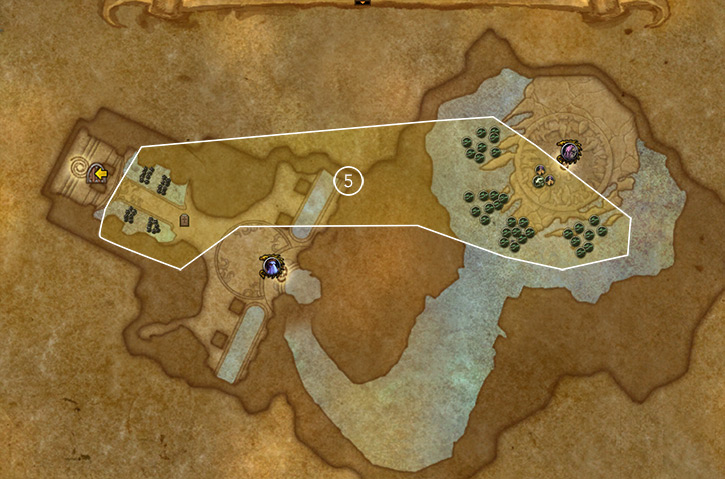
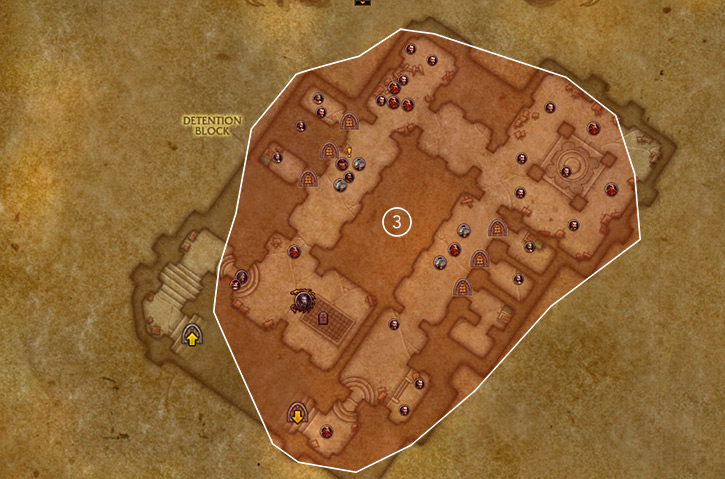
This is the section that pretty much every group skips. If you decides not to skip, the trash is pretty straight forward and there's nothing unique we have to counter abilities in this section so just spread out for Void Seeds and interrupt Unending Darkness.
The bridge (4) is full of mobs that really only do 2 things that you need to worry about. One is a drowning debuff that you need to dispel, the other is a frontal AoE that you need to avoid. There shouldn't be much damage going out so feel free to focus on dps.
If you're killing both sets of Dwellers, always do one pack before the 3rd boss and one after so you can use Devo on both packs, and if it's high fortified you may need to also pop Wings/HA. Always use all your cooldowns (wings/ha/bubble/sac/loh) on the second pack after ths boss as you will have Wings/HA back by the time you swim to the last boss and you can't use Sac, Bubble or LoH on the last boss anyways.
If your group doesn't already, you should make sure to hold doing the 3 pack in front of the final boss until after the first intermission phase of the last boss so you can use the damage buff to kill them way faster since the boss just afk's until you interrupt him anyway. When you dps this pack, make sure to put a glimmer out on each mob, but tag the Denizen last so the tank can generate threat first (it's the only mob in that group that can melee you).

Every healer's favorite elemental got significantly easier with the emergence of Glimmer, but is definitely still the most healing intensive boss in BFA. Doing this boss on very high keys requires extremely good communication. Make sure no one uses any significant defensives while your Wings or Holy Avenger are up. Use your cooldowns one after the next in the following order (do not overlap any cooldowns):
Wings > Holy Avenger > Devotion Aura > Call for Immunities > Health Potions > Wings > Holy Avenger
Make sure you Sac someone when you Bubble and try to have Lay on Hands available for this boss.
Similar to Galvazzt, this boss has a very high hps requirement. You'll want to use Wings and HA on pull to spread glimmer on the Hexers and your party. The first phase is definitely the most difficult since you'll have lust for the second phase so make sure you use whatever you need to survive Phase 1. The most difficult part of this fight is mana conservation since there normally isn't a mob you can CS to reset Holy Shock on during the Intermission.
Fortunately, there's a trick we can do that will keep a mob active in this phase. There are 2 Plague Doctors that spawn during the main phases. Kill the first, and then use some type of CC (Blind, Poly, Trap, etc) on the second. Once the intermission phase starts, have your tank break the CC and bring it close to the boss so you can use it to reset your Holy Shock to heal the boss efficiently.
This trash has some of the highest hps requirement in the game, especially on teeming week. You need to use Wings and HA for the double Dervish / Nimbus pull at the top of the stairs at Galvazzt. This is also a good spot for Devo/Bubble as they will come back up before the 1 minute mark during Galvazzt which is when you'll need to use them.
For the second 3 pack (which is the last pack before the boss spawns) you should use Holy Avenger and the whole group should use health pots / health stones if needed. On high fortified keys, make sure your dps are hard focusing down one at a time or you'll probably wipe. You have to save Wings here for the start of Galvazzt. The only time I'd suggest using Wings on this pack is if it's a VERY high fortified key, in which case your wings will be close enough to back up by the time the boss is pulled that you should be fine.
Cragmaw is all about managing your group's defensives. On high tyrannical keys, you need to have complete control over how everyone uses their immunities and major personals. Each Tantrum you'll need something large for, and this is one of the few bosses where pre Glimmering is required. Let's go over an example of cooldown rotations for this boss.
Start with popping Wings about 10 seconds before the first Tantrum, then Holy Avenger right before Tantrum starts. For the next Tantrum, you should use Devo/Rally if you're running with a warrior tank, or Devo + pre Glimmers if you aren't. For the third Tantrum, if your Wings/HA aren't up, pre Glimmer everyone but yourself, then Bubble and sac your squishiest dps. For the fourth Tantrum you should have Wings/HA up again. For the fifth, you'll want to immunity yourself again using BoP and then have everyone else use health pots or immunities.
Underrot is a really strong instance for us as it's mostly just a damage throughput dungeon and we have some really strong utility for a lot of the trash. At the start, if your group decides to pull Ticks just pop Devo/Bubble and Sac the tank and everyone will live without you needing to use Wings or HA. You want to use your main cooldows for the 4 pack, especially if you pull the Matron in (most groups will sap the maggot and pull the Matron into the 4 pack and lust).
One cool thing you can do is BoP your ranged dps if you have one as the Matron's charge will always go on them. BoP will full immune the damage and prevent the bleed from the slash as well. You can also Freedom the player that gets snared from the Headhunters or HoJ / Blinding to stop it preemptively.
The biggest thing we lack for this section of trash is Soothe. The Deathspeakers will cast Wicked Frenzy and debuff your tank with Wicked Assault which does an absolutely disgusting amount of damage. If you don't have anyone in your group that can Soothe your tank will have to kite this on high keys unless they have every defensive up.
Once the mob loses the Wicked Frenzy buff you can dispel the debuff but trying to dispel it before that will just cause the mob to instantly reapply it unless your tank is out of melee range.
On higher keys, if you're full HP and have Divine Protection up and some type of shield (resounding, bulwark, engi belt, etc) then you can live through the first Upheaval without Bubble, but after the first Upheaval of the fight you will absolutely need to Bubble any others that go on you. Make sure you use Divine Protection every Sandstorm, and use Devo during Sandstorms that you don't have cooldowns for.
If you don't have good communication with your group to call out when they should use something to stay alive, you may want to stagger your Wings and HA on this fight. If you're confident in your group, you should be fine to group them.
As the biggest RNG fight in BFA, Korgus does not disappoint on tyrannical. He likes to keep things interesting by randomly changing up his spell order, which makes this fight either relatively simple to heal or extremely difficult. Have your dps call out if it's a double or not when Explosive Burst is coming out so you know whether you should use Devo. The first double you get you should use Devo on unless you have your cooldowns up. If a double goes on you, you can actually immune both with Bubble but you have to wait to use it until roughly 1 second before the first detonation.
One thing to be aware of is that you can BoP the Deadeye shot that targets ranged players. BoP will not only clear the 2 minute debuff it leaves, but it will also immune the damage from the shot and prevent the application of the debuff. So ideally if you're running with one ranged and you don't have a Demon Hunter soaking all of them, have your ranged soak the first, then you can BoP the second, then they can soak the third.

Waycrest has a lot of dangerous bosses, but none more deadly then Sisters. The first sister doesn't really do much and due to the 50% healing reduction you should focus on damaging during her phase. Use HoJ to stun whoever gets MC'd by Soul Manipulation and then dispel the stun once they're broken out. The main thing to heal through in this fight is Sister Malady.
Unstable Runic Mark will do a ton of damage to everyone, all while Aura of Dread damage is ticking. The reason you pop wings 10 seconds in (and not just hold it for Malady) is that with lust, the first boss gets phased within about 20 seconds. This means your wings will still be up through the first Runic Mark cast which is all you need to survive. It also means that by the time you come back around and get to Malady again, your wings will be back up. Adjust your initial wings time if your group's damage is low.
Fortunately, the third sister's main mechanics we can nullify with BoP. You can BoP Jagged Nettles before it goes out and it will fully immune the damage. If you BoP after it goes out, it will still clear the debuff but the initial application does a huge amount of damage so try and get it off before.

This fight is exactly like Cragmaw for healers, so make sure you don't overlap too many things. Play it the same way and use Wings/HA on pull to get through the first Rumble and Charged Smash abilities easily. For the second Charged Smash/Rumble, use Devo for the Charged and then Bubble yourself and sac your most squishy dps. For the third set you should have wings up again, and if you get a fourth, use your BoP on your most squishy dps and use Divine Protection + Health Pot for yourself so you only have to focus two players.
As a quick non healer suggestion, when charged smash goes out make sure everyone soaks and uses the debuff to charge the four pylons and the robot. Assign the dps and tank each to one of the four pylons, and assign yourself the robot as it requires the least amount of running. Everyone should position themselves around the boss during charged smash so they get knocked in the direction of their assigned charge.
The only healing intensive part of this fight is Phase 1 and it's all single target damage from Fulminating Zap and Wreck. The zap will tick on your teammates for approximately 6 trillion damage. It's very overtuned right now so make sure if they don't have a personal and you don't have wings up that you sac/devo for them or they can easily die. Your tank should be fine living through Wreck but only if they mitigate / self heal well, so make sure if you know they aren't very good to give them extra attention whenever wreck is coming out.
Once intermission hits just horse up the ramp and bubble through the entire event (lol mechanics). Ideally you want the dps and yourself to return to the bottom of the platform around 10 energy left so that once the tank finishes the last channel, everyone can go straight into boss with lust for the burn phase. During burn phase just use Wings/HA offensively and pump as hard as possible! If you get another phase, just wings as soon as it's up again during phase 1.
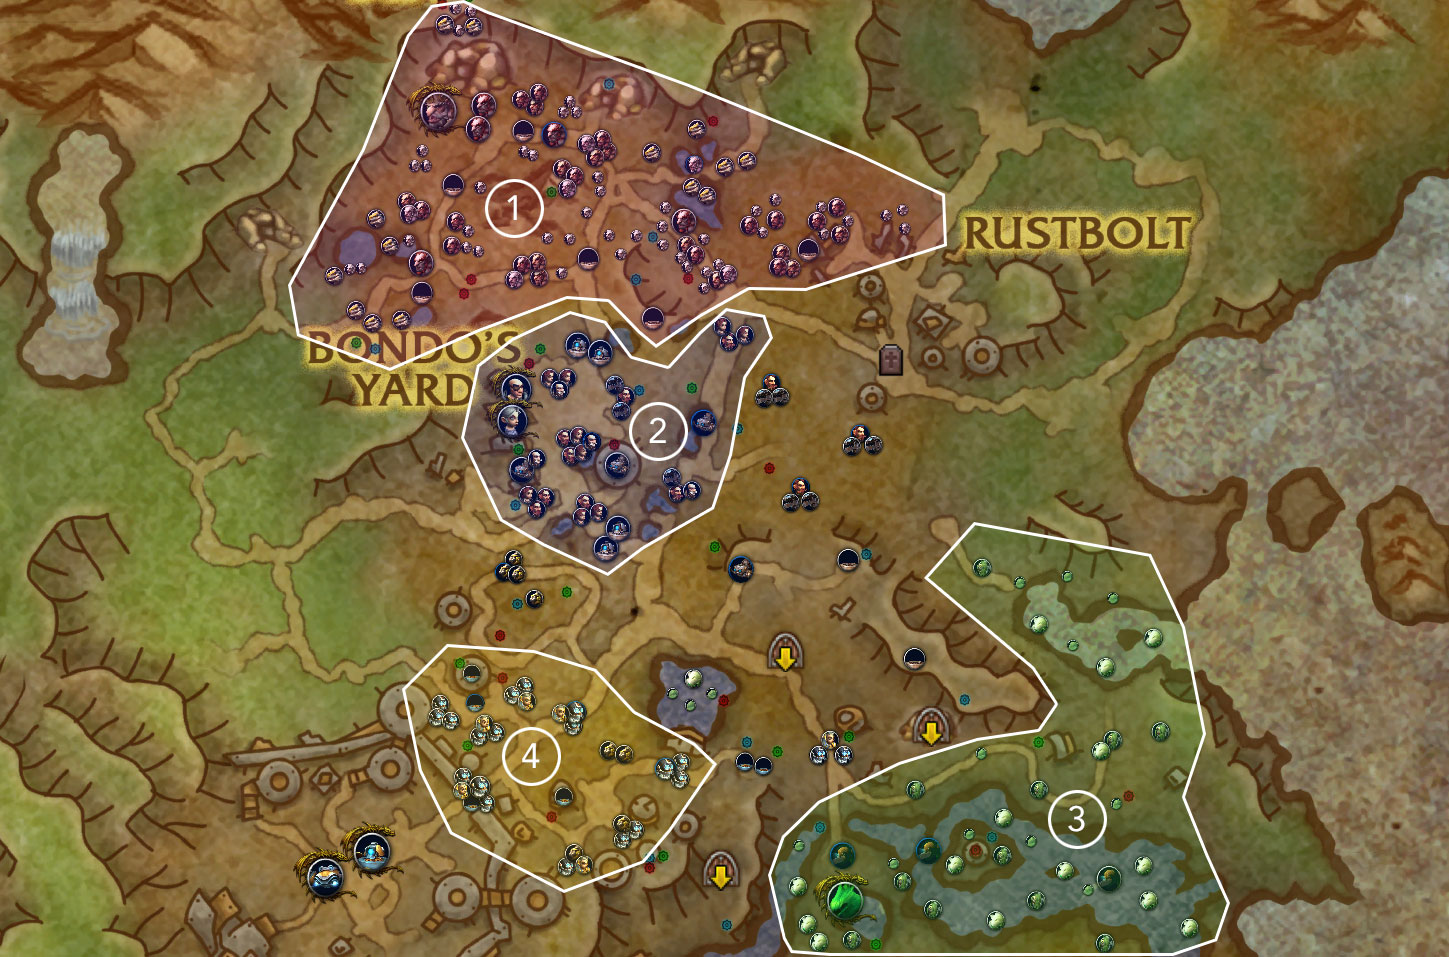
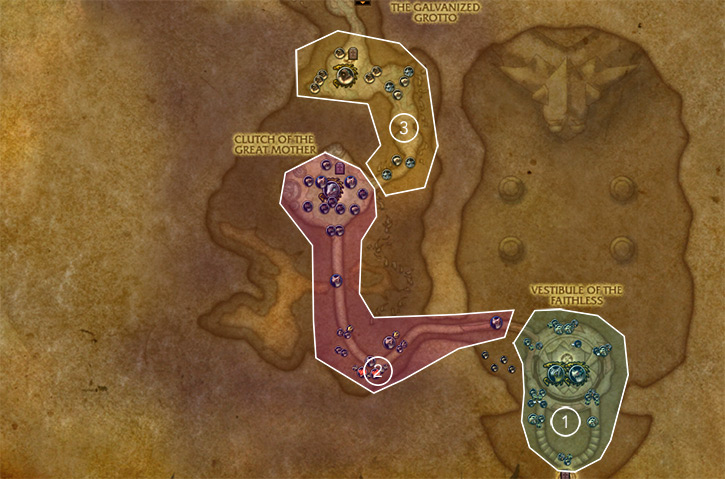
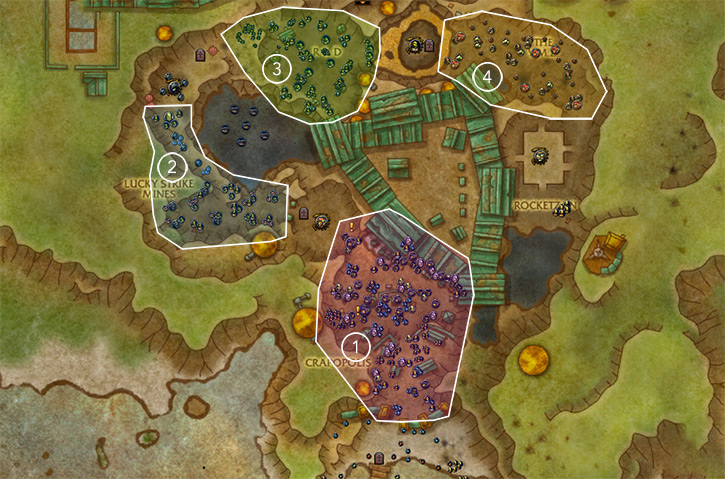
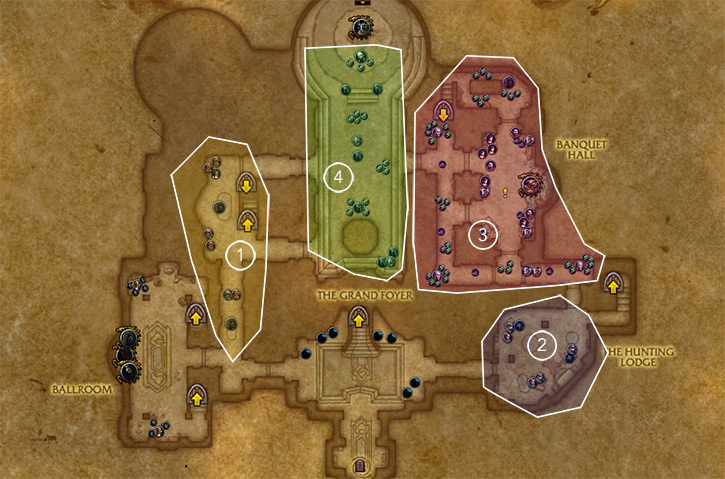
Gobbamak trash is pretty straight forward healing wise, and in most routes will be skipped with Awakened pillars. There are only a few mob types, and most of them aren't very threatening hps wise unless you do large pulls, which is definitely not suggested. The main dangerous mob type in this zone are the Bully's, which do heavy tank damage and have a 60 yard frontal called Shockwave that will one shot you. The little Grunter mobs all around are very insignificant but have no aggro table so they'll just walk around hitting people lightly, which means there's some slight aoe damage but they're very weak.
Another slightly dangerous mob in here is the Scrapbots, which you'll see in other areas of the dungeon as well. These are general not very threatening unless your melee just afk inside the spinning blades aoe they do (Gyro Scrap). I'd generally suggest using a different mob to CS with if possible so you don't have to deal with running away constantly. The Trashtossers and Grinders don't do much other then ground effects you have to move out of but BEWARE, the foliage in this area makes the ground effects impossible to see so stay off the grass, keep your feet on the dirt so you can always see the red swirls.
There is only one mob in here that you should avoid: Scrapbone Shaman. Ideally make a route that involves not pulling these mobs ever as you will wipe if they get a single Grasping Hex cast off (roots your entire party for 8 seconds, only dispellable with decurse).
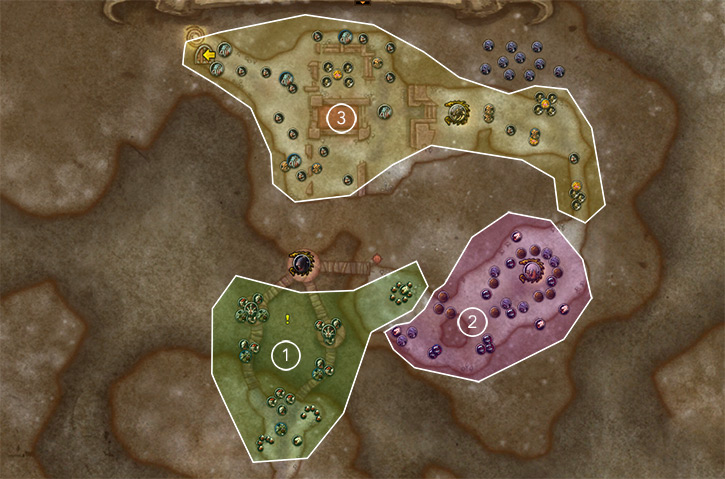
The trash in Trixie Naeno area is probably the most dangerous out of all the trash in the dungeon so be very careful how you pull this area, don't try and pull too many groups at once. The worst pulls will be the Crawler, which does massive party wide AoE with its Shock Coil ability. Make sure you have Wings/HA available for this, and if you get a second cast use Devo/Bubble/Sac.
The Blasters are the second most dangerous mobs as they will spam Run n' Gun or shoot depending on if they're moving or standing still. Luckily BoP works on this so you should BoP any squishy dps that's being targeted by too many shoots if you're outside of your major cooldowns. Also make good use of HoJ and Blinding Light on these mobs to prevent a lot of their damage from ever going out. Lastly you should be aware that if a Mechanic gets off an Overlock on any mob, it needs to be removed immediately. Unfortunately we can only do that with blood elf racial, otherwise you'll need a Mage/Shaman/DH to purge it. Avoid the Scraphound's frontal Bork cast as it does huge damage and makes you lose 50% of your haste,
Last and least, the trash before HK-8 is actually the easiest trash in the dungeon. As long as you interrupt Coilbearers and dispel anyone who gets the Shrink debuff IMMEDIATELY this trash shouldn't pose any threat. If you pull a lot of Trooper's at once, your tank may get high stacks of the Nanoslicer debuff, but you can BoP that off if your tank has a cancel BoP macro.
There is only one actually threatening mob in this area and that's the Cavary who will become a turret and will spin in a circle doing a frontal attack. This is exactly the same as the last boss in Motherlode so just know when it's coming out and walk around it in a circle while it's spinning. If you're in a real pinch and can't avoid it you can Bubble or BoP to immune the damage.
This fight is also just like Cragmaw for healers, so make sure to use your full kit on this boss during the Flame Jets. The strategy of this fight is super straight forward, you just want to always bait the maximum thurst to a hammer and then keep Gnomercy 4.U. under the hammer until it dies. Make sure everyone stays in melee and doesn't move until Flame Jets go out. Once Flame Jets happen, ideally it targets someone with an immunity who can just sit there so it stays under the hammer during the fixate, otherwise just kite it away and once it's over, bait the next maximum thurst back into the hammer you were using before.
Assuming you use Wings on pull, you'll have it still rolling for the first vent jets. Ideally you should delay you Holy Avenger ~10 seconds into wings so that it's also active during the first jets. It will not be active for the second Flame Jets so that will be where you want to use Devo + Bubble + Sac and keep possibly maybe throw out a few pre glimmers if you're pugging. You shouldn't ever get a third Jets but if you know you will, just save your second wings for it.
The amount you have to heal this fight can either be nothing or a billion depending on the skill level of your group. All the damage in this fight is avoidable except for the shoots from the flowers that spawn, but even that can be mitigated by stunning the flower and focusing it down. Your goal for this fight should be to dodge all mechanics while healing anyone who gets hit. The best thing you can do in this fight is look for the flower when it spawns, horse over to it and use Hammer of Justice to stun it for 6 seconds. This should give your group plenty of time to kill it before it starts melting someone with damage.
Although getting hit by anything on this fight is highly dangerous, there are some things you should look to help with more then others. If anyone gets hit by Discom-BOMB-ulator (blue swirl on the ground), dispel them IMMEDIATELY as they will be disoriented and probably die to the other mechanics very quickly. Second, if anyone gets the Flame Cannon's debuff either they need to immunity or you need to sac/devo and focus them hard until the debuff is gone.
Every part of this boss fight is difficult and will honestly be hell in PUGs. The hardest hitting thing is definitely Giga-Zap which is a single target frontal that the boss will target a random player with. Anyone who gets this should stand still and let the other people move away from the frontal as it will hit anyone between the boss and his target, and anyone more then the person targeted getting hit by this is absolutely brutal to heal through. The initial application of the debuff hits insanely hard, and the DoT that's left on the player hits even harder. Ideally in phase one anyone with 2 minute immunities like Rogues and DH's should use them in Phase 1 on Giga-Zap as they will be back up for Phase 2.
For Phase 2, you want to Wings as soon as you come out of the stun and delay Holy Avenger for 10 seconds into Wings, this way both will be up for Magneto Arm, the big AoE damaging ability in this phase. This will also make it so that you can Wings/HA the second Magneto Arm as well so ideally people use immunities on the set of Giga-Zap's after the first Magneto Arm when you don't have any healing CDs rolling. If you know Giga-Zaps will be going out, I'd suggest running Devo there rather then during a Magneto Arm as those debuffs hurt more.


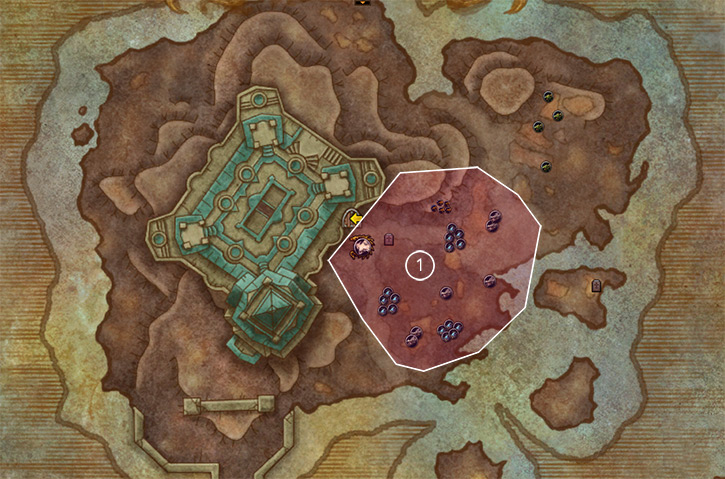
The trash before the first boss, if dealt with correctly, should kill itself and require pretty much 0 healing. Once you engage the mobs, immediately bring them over to one of the nearby hammers and tank them under the hammer, they will die within 2 hits. All you have to do is not get knocked around by the blades and avoid the fire circles on the ground. It's helpful if you can stun the mobs under the hammer with HoJ.
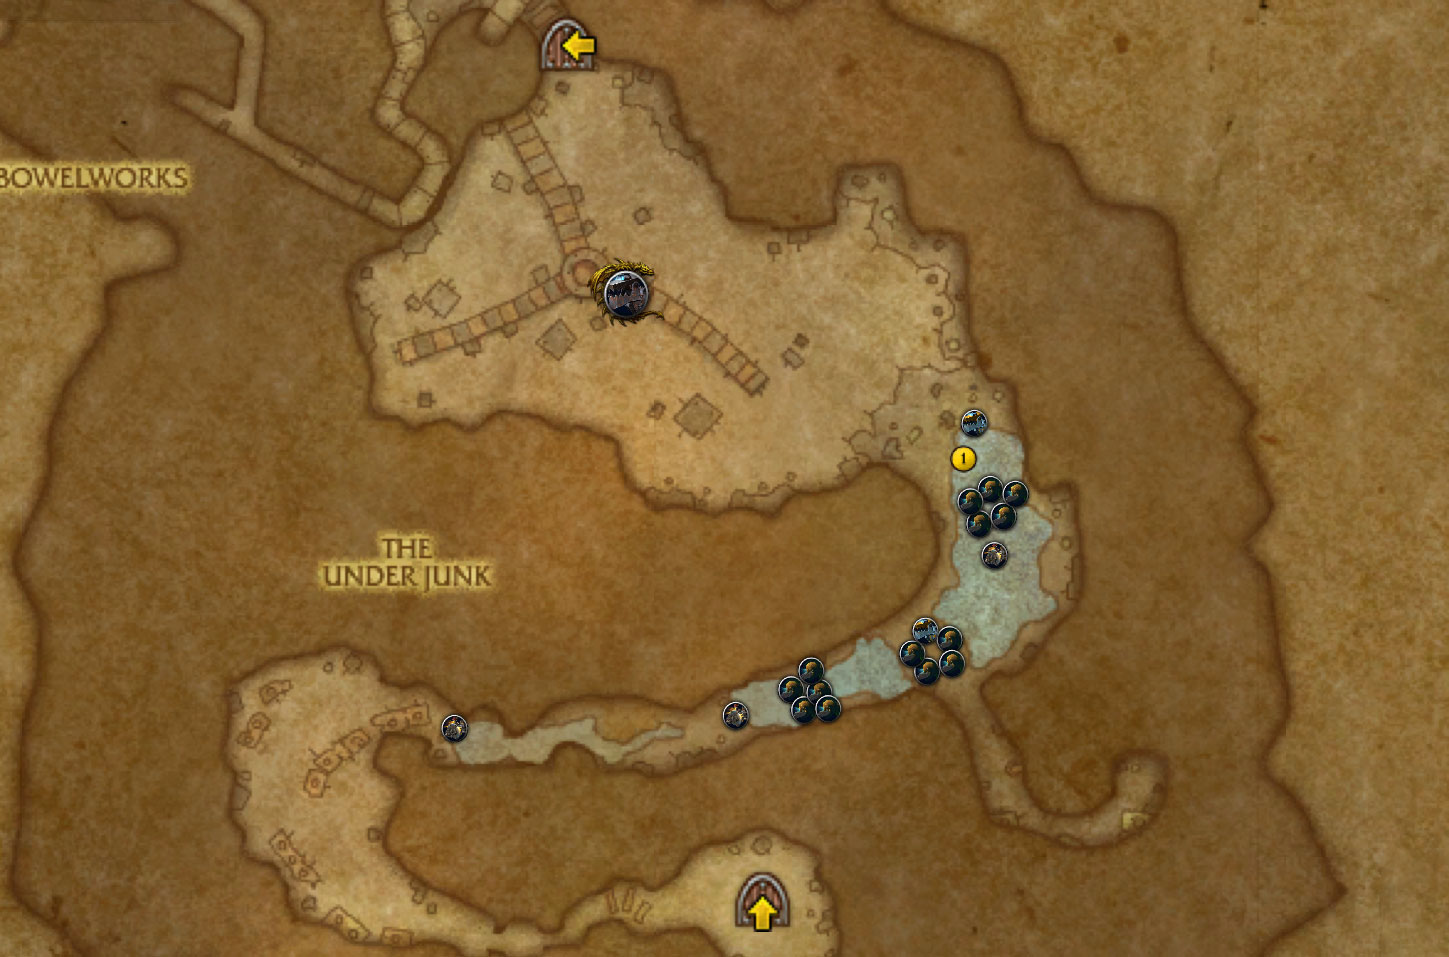
The Underjunk trash is very straight forward and easy if pulled correctly, but deadly if not. The first pull should always be the two Waste Processing Units together, then you should take the Awakened pillar to the boss area. Once you kill the Awakened mob there, take the pillar back up and now you can pull the rest of the trash from that side. This is important because the AoE that the Living Waste's do can be line of sighted behind the pillars by the boss room. The best way to pull these is to pull them back to a pillar, aoe them down evenly, then LoS behind the pillar when the explosions are going off. If you do this correctly, there will be next to no damage on these pulls to heal through. If you don't do it that way, make sure you have Devo for one pull, Bubble for another, and Divine Protection + Health pot the third, but that's definitely not recommended.
The only other mob in the Underjunk that's relevent to a healer is the Junkyard Dog's Flaming Refuse, which can and should be dispelled instantly as it does a lot of damage. Ideally the dogs will sync up their casts of this since they always cast on the ranged dps (if you have one), so if you can get the dogs to sync their casts (using HoJ/Blinding or the tank kiting briefly) you'll only have to dispel once as they'll get both debuffs at the same time.
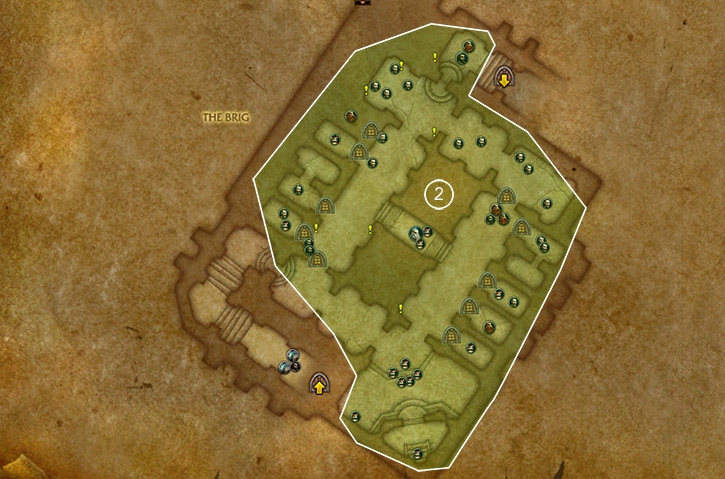
The rest of the trash in this dungeon is comprised of only a few different types of mobs that you have to deal with as a healer. First up is the tinkerer's which do a Giga-Wallop cast that will hurt a lot if the player has no defensive. It leaves a nasty debuff as well so make sure any time one of these casts gets off that you focus heal whoever has it. Using HoJ on these mobs is highly recommended.
In the Gauntlet you'll have to fight a Defense Bot Mk III which will cast a Short Out ability that does massive aoe damage to the group. Make sure you either have Wings/HA or Bubble/Sac/devo for this as it will hurt a LOT. Your dps should be hard focusing this mobs so it should only get one cast off so don't worry about saving anything for the second unless your dps is very very low. All 3 mobs in this part of the gauntlet also cast Arcing Zap which will apply a very intense debuff to someone, so this is a great spot for immunities and being quick with your dispel (prioritize anyone who gets 2 debuffs as they can stack and 2 = death if not dispelled). The final mob in the gauntlet doesn't actually do anything you need to heal through, just dodge the frontal and do the dance properly and everything should work out fine!
Outside of the gauntlet the other mobs you'll have to deal with are all the same, but in each major pack there will be shield bots that your group should be standing in to avoid damage as it reduces incoming damage significantly. Make sure you or someone in your group always stuns the squirrels that spawn during these trash packs before their big AoE goes off though as it's still very dangerous, otherwise just keep dispelling people on cooldown and healing through their debuffs.
P.S. NEVER PULL THE PACK BEFORE LAST BOSS OR THE 2 PATTING DEFENSE BOTS. If you pull the rest of the dungeon's trash you can skip both pats and the entire pack before last boss with the pillar at the bottom of the ramp. Not skipping these mobs is the worst thing you can do in a key as all those mobs are extremely dangerous.
Since the initial nerfs this add is definitely more manageable, but is still very dangerous. As a Holy Paladin we can BoP off the stacks that the adds put out so if a dps takes too many stacks or the tank gets overwhelmed with stacks, BoP it off (make sure the tank cancels BoP immediately).
The rules for dispelling the fears on this boss is always the following: Tank > Healer > DPS. If you play with a warrior tank, let them fear immune the first with Beserker's Rage so you can free up a dispel for another target. It's very important you have either wings+ha or bubble+sac+devo available when pulling this mob as it is a very high damage encounter.
This Lieutenant is either fairly simple or extremely difficult dependent on how big of heroes your dps try to be. The goal here should be to get some damage out on the adds quickly, then once pools start dropping, EVERYONE leaves with the blob together and works on it until the eyes reappear at your location (once you're LoS'd or ranged from them, they'll relocate to the blob). HoJ / Blinding Light are very strong here as Blinding will cancel multiple channels and HoJ stops one from channeling for 6 seconds.
What causes trouble in this encounter is when dps try to stay back too long and fight the eyes rather then moving with the tank and blob. If any dps stay and continue to fight the eyes once the tank has left, do not try to go back and help them, at that point they're on their own. Your job is to stick with the tank and focus any eyes that reappear with the blob.
Make sure to minimize group damage that you dispel anyone with 2 or more eyes channeling on them, and use Blessing of Freedom on anyone who's being slowed and needs to make it through pools (generally yourself since paladin mobility is awful).
Urg'roth is a straight forward encounter with a very low healing requirement if your tank knows what they're doing. Whenever they take a Spirit Breaker hit, make sure they're topped and give them an external if they don't have a CD up. We can use Devo for one, Sac for another, and BoP for one as well (which will fully immune the damage and prevent the debuff from applying).
The way BoPing this ability works, is once the mob has started casting Spirit Breaker, no matter who gains threat it will always cast on the target it chose when the cast started. This means once the cast has started, you can BoP your tank and have them leave it on them for the full cast, then once the ability goes off they cancel BoP immediately to regain threat (they should also taunt once they get BoPd for safety). If you do this make sure your tank knows how it works and let them call for it so they can save their cooldowns.